Tobias Knell
08.01.2013A small look into Google Cloud Messages
Within the scope of some Android R&D I took a look at Google’s Cloud Message Service, GCM.
Well, the starter guide athttp://developer.android.com/google/gcm/gs.html is almost all you need to get started, so I’ll explain my setup and some further instructions for a small test case.
In case you already decided to setup GCM for yourself: make sure to do the guide above until you reach the ‘Writing the Android Application’ part.
The Android Application
Start with creating a new Android Project with a minimum Android API version of 8 (2.2). I just named it ‘CloudMessageTest’ with the MainActivity ‘CloudMessageTestActivity’. After you’ve done that, create a folder named ‘lib’ in your app’s root directory and copy the android GCM library from YOUR_SDK_ROOT/extras/google/gcm/gcm-client/dist/gcm.jar to the created lib folder. Next, Add the library to your build path (go into the Project properties -> Java Build Path -> Tab Libraries and select add JARs to add the gcm.jar).
For GCM to work, we need to add some permissions to our AndroidManifest:
<permission
        android:name="com.synyx.cloudmessagetest.permission.C2D_MESSAGE"
        android:protectionLevel="signature"/>
<uses-permission android:name="com.synyx.cloudmessagetest.permission.C2D_MESSAGE"/>
        <!-- App receives GCM messages. -->
<uses-permission android:name="com.google.android.c2dm.permission.RECEIVE"/>
        <!-- GCM connects to Google Services. -->
<uses-permission android:name="android.permission.INTERNET"/>
        <!-- GCM requires a Google account. -->
<uses-permission android:name="android.permission.GET_ACCOUNTS"/>
        <!-- Keeps the processor from sleeping when a message is received. -->
<uses-permission android:name="android.permission.WAKE_LOCK"/>
And declare a GCM broadcast receiver within the application tag:
<receiver
        android:name="com.google.android.gcm.GCMBroadcastReceiver"
        android:permission="com.google.android.c2dm.permission.SEND">
    <intent-filter>
        <action android:name="com.google.android.c2dm.intent.RECEIVE"/>
        <action android:name="com.google.android.c2dm.intent.REGISTRATION"/>
        <category android:name="com.synyx.cloudmessagetest"/>
    </intent-filter>
</receiver>
<service android:name=".GCMIntentService"/>
The GCMIntentService has to be created by us. And that is what we’ll do now. First off, the GCMIntentService has to extend the class GCMBaseIntentService:
public class GCMIntentService extends GCMBaseIntentService {
Now implement all the necessary methods. The only method we will use for this little test is onMessage(). We want to quickly see if we get a message for this app, so that we can confirm that it works. So we just create a notification with the Notification Builder.
Because we are on an older minimum version of Android, we need to add the support library to have access to the Notification Builder. Add it by right clicking the project -> Android tools -> Add Support Library.
First in the onMessage() method, we need to get access to the Main Thread of our App.
Handler h = new Handler(Looper.getMainLooper());
h.post(new Runnable() {
    public void run() {
    }
}
In the run() method, we get us an Intent from our MainActivity
Intent notificationIntent = new Intent(context, CloudMessageTestActivity.class);
And then wrap it with a PendingIntent for the NotificationBuilder
PendingIntent pendingIntent = PendingIntent.getActivity(context, 0,
                        notificationIntent, 0);
Finally, use the NotificationBuilder to create and send the notification
NotificationCompat.Builder builder = new NotificationCompat.Builder(
context);
builder.setContentIntent(pendingIntent);
builder.setAutoCancel(true);
builder.setSmallIcon(R.drawable.ic_launcher);
//this is added on the server side
String text = intent.getStringExtra("text");
builder.setContentText(text);
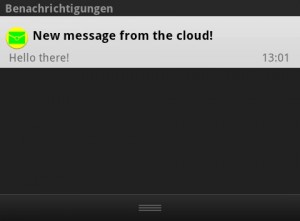
builder.setContentTitle("New message from the cloud!");
Notification noti = builder.build();
NotificationManager mNotificationManager = (NotificationManager) getSystemService(Context.NOTIFICATION_SERVICE);
//just set the mId to 1, because we don't care about it in this case
mNotificationManager.notify(1, noti);
That’ it with the GCMIntentService.
Now we let the app register itself with GCM in our MainActivity, which is fairly easy:
//set your senderId from the API here!
 private static final String SENDER_ID = "1234567890";
@Override
protected void onCreate(Bundle savedInstanceState) {
  GCMRegistrar.checkDevice(this);
  GCMRegistrar.checkManifest(this);
  final String regId = GCMRegistrar.getRegistrationId(this);
  // if we don't have a regId yet, register at gcm
  if (regId.equals("")) {
    GCMRegistrar.register(this, SENDER_ID);
    Toast.makeText(getApplicationContext(), "Registered GCM!", Toast.LENGTH_LONG).show();
    // just log the registrationId for this test case.
    Log.i(this.getClass().getName(), "id: " + GCMRegistrar.getRegistrationId(this));
  } else {
    Log.i(this.getClass().getName(), "Already registered");
    Toast.makeText(getApplicationContext(), "Already registered at GCM!", Toast.LENGTH_LONG).show();
    Log.i(this.getClass().getName(), "id: " + GCMRegistrar.getRegistrationId(this));
   }
}
Don’t forget to replace the SENDER_ID with yours!
I haven’t implemented a way to let the server know the registrationId, because reading it from the log seemed sufficient for me in this case.
With this, we finished our small app and can begin implementing the server part.
The Web Application
For the Web Application, I created a maven web project with spring-webmvc and named it ‘GCMTestServer’. I’ll leave out the config stuff for now, as everyone can use his/her favorite stack for this. The full sources with the configs are attached at the end of the blogpost.
Instead of just copying the GCM server library into the project, I searched a bit and found someone, who created a repository for it. (https://github.com/slorber/gcm-server-repository)
We start with creating the Sender class, which isn’t that hard either.
public class GCMSender {
 public String apiKey = null;
 public GCMSender(String apiKey) {
   this.apiKey = apiKey;
 }
 public String send(String text, String id) throws IOException {
   Sender sender = new Sender(apiKey);
   Builder builder = new Message.Builder();
   builder.addData("text", text);
   Result result = sender.send(builder.build(), id, 5);
   if (result.getMessageId() != null) {
     String canonicalRegId = result.getCanonicalRegistrationId();
     if (canonicalRegId != null) {
     // same device has more than on registration ID: update database
     return "same device has more than on registration ID: update database";
     }
   } else {
     String error = result.getErrorCodeName();
     if (error.equals(Constants.ERROR_NOT_REGISTERED)) {
       // application has been removed from device - unregister database
       return "application has been removed from device - unregister database";
     }
   }
   return null;
 }
}
To send messages from the server, I created a small jsp page where I can enter the text and the RegistrationId of the user to send the message to:
<%@ taglib prefix="c" uri="http://java.sun.com/jsp/jstl/core" %> <%@page
contentType="text/html" pageEncoding="UTF-8"%>
<!DOCTYPE html>
<html>
  <head>
    <meta http-equiv="Content-Type" content="text/html; charset=UTF-8" />
    <link
      rel="stylesheet"
      type="text/css"
      href="/GCMTestServer/frontend_resources/style.css"
      media="screen"
    />
    <title>GCM Sender</title>
  </head>
  <body>
    <h1>GCM Sender</h1>
    <c:if test="${success == true}">
      <div class="success">sending successful!</div>
    </c:if>
    <c:if test="${error == true}">
      <div class="error">
        Error at sending!
        <p>${errormessage}</p>
      </div>
    </c:if>
    <form method="POST">
      <label for="text">Text</label
      ><input name="text" id="text" type="text" /><br />
      <label for="id">Registration-Id</label
      ><input name="id" id="id" type="text" /><br />
      <input type="submit" />
    </form>
  </body>
</html>
In the corresponding Controller to process the request, send the message:
    @RequestMapping(value = "send", method = RequestMethod.POST)
    public String send(Model model,
        @RequestParam("text") String text,
        @RequestParam("id") String id) {
        String error = null;
        try {
            error = gcmSender.send(text, id);
        } catch (IOException ex) {
            model.addAttribute("error", true);
            model.addAttribute("errormessage", ex.getMessage());
        }
        if (error == null) {
            model.addAttribute("success", true);
        } else {
            model.addAttribute("error", true);
            model.addAttribute("errormessage", error);
        }
        return "sender";
    }
Now we are ready to test it!
Start the app, copy the RegistrationId from the Logs, start the Server, enter the RegistrationId and a small text, and there you go:
To get a better understanding, you can also read the rest of the starting guide and the other documentation.
All together, it’s really easy to use the GCM libraries and the messages are beeing sent to the user very fast (around one second for me). I haven’t tried to use it in a greater context with more users yet, but I don’t think google will fail on this behalf 😛
As promised, here are the full sources:CloudMessageTest